Redis
Core Redis Archtecture
Process Model (Single-threaded Core)
Redis using single-threaded event loop for command processing. It’s extremely fast because:
- No locks -> no thread contention.
- Uses I/O multiplexing (
epoll/kqueue) to handle thousands of client connections. - Heavy wrok (AOF rewrite, RDB save) offloaded to background processses.
📌 Key insight: Redis trades CPU parallelism for predictable latency and simplicity.
Data Structures (In-Memory Storage)
Redis isn’t just key-value store: it provides specialized data structures. Each is optimized for memory and speed.
| Type | Example Command | Use Case |
|---|---|---|
| String | INCR counter | Counters, cache |
| List | LPUSH queue job1 | Task queues |
| Hash | HSET user:1 name Alice | User profiles |
| Set | SADD tags redis nosql | Unique tags |
| Sorted Set | ZADD leaderboard 200 Bob | Leaderboards |
| Stream | XADD mystream * msg hi | Event sourcing |
| NEW: JSON | JSON.SET user:1 $.city '"Paris"' | Document store |
| NEW: Vector Set | VSET myvec 1 [0.1,0.9] | Semantic search |
| NEW: Probabilistic | BF.ADD seen user42 | Deduplication, top-K |
| NEW: Time Series | TS.ADD sensor:1 167000 temp 22.5 | IoT metrics, monitoring |
NEW: supported in Redis 8.0
Memory Model
- SDS (Simple Dynamic Strings): safe strings, O(1) length.
- Encodings:
- Small hash ->
ziplist; grows ->hashtable. - Set of ints ->
intset; grows ->hashtable.
- Small hash ->
- Redis 8 Optimizations:
- Vector data can use
BFLOAT16/FLOAT16. - JSON memory defragmentation.
- Vector data can use
Persistence
Redis can persist data for recovery:
- RDB Snapshots: fast restart, some data loss.
- AOF: append-only, durable, bigger file.
- Hybrid: default in Redis 8
JSON & Has Enhancements
- Partial Updates: update only one field inside JSON.
| |
- Field-Level TTL: expire one field in a hash.
| |
- Better Memory Efficiency: JSON defragmentation reduces latency spikes.
Time Series Enhancements
At its core, a time series is just timestamp + value pairs. RedisTimeSeries builds efficient structures on top of Redis primitives.
How Data is Stored
- Each series is implemented as an append-only chunk list:
- Chunk = fixed-size block of consecutive samples (timestamps + values).
- New samples go into the active chunk until full → new chunk created.
- Chunks are kept sorted by time for efficient range queries.
- Chunks are compressed in memory to reduce footprint (delta-of-delta for timestamps, Gorilla-like encoding for values).
Insertion
TS.ADD key timestamp value-> appends to the latest chunk.- If timestamp is out-of-order but still within chunk bounds, it’s inserted in place.
- Late data allowed, depending on config.
Query Engine
Support efficient reads:
- Range queries ->
TS.RANGE key from to. - Aggregations (avg, min, max, sum, count, stddev, percentile).
- Downsampling via compaction rules.
| |
(avg per 60s window).
Scaling with Large Datasets
RedisTimeSeries is designed to support millions of samples per second and billions stored.
How it scales:
- Chunk-based storage -> O(1) appends, memory-efficient.
- 2Retention policies -> old data auto-expired, keeps RAM manageable.
- Compaction rules -> store raw + aggregates, so queries don’t scan billions.
- Multi-key partitioning -> year can shard by metric, location, or device.
- Redis Cluster -> distribute series across many masters/replicas for horizontal scale.
Core Query Language Concepts
Redis TimeSeries provides a powerful query language that operates on two fundamental levels:
- Individual time series operations (
TS.GET,TS.RANGE) - Multi-series operations with label filtering (
TS.MGET,TS.MRANGE,TS.MREVRANGE)
Label-Based Indexing System
Every time series can have labels (key-value pairs) that create searchable indexes:
| |
Setting Up Cryptocurrency Data Structure
Complete Multi-Exchange Trading System
| |
Automatic Candlestick Generation Rules
| |
Advanced Query Patterns
- Label-Based Discovery Queries
| |
- Time-Based Range Queries
| |
- Multi-Series Queries with MRANGE
| |
- Multi-Series Operations
Cross-Exchange Arbitrage Detection
| |
Volume-Weighted Average Price (VWAP) Across Exchanges
| |
- Aggregation and Candlestick Generation
Dynamic Candlestick Aggregation
| |
Bucket Alignment Strategies
| |
- Redis Workbench Query Examples
| |
Best Practices and Optimization
- Label Design Strategy Use hierarchical labels for efficient filtering Include both broad (symbol) and specific (exchange, interval) labels Add metadata labels (market type, base/quote currency)
- Query Performance Optimization
Use specific filters to reduce result sets
Create composite labels for frequently used combinations
Leverage
SELECTED_LABELSto reduce response size - Memory Management
Set appropriate retention policies per series
Use compaction rules for automatic aggregation
Monitor memory usage with
TS.INFO - Production Deployment Use connection pooling for high-throughput applications Implement circuit breakers for exchange API failures Cache frequently accessed aggregations
Redis Cluster Architecture Overview
Sharding with Hash Slots: Redis Cluster automatically shards data across multiple nodes using hash slots. There are 16,384 hash slots, and each key is assigned a slot by taking the CRC16 hash of the key and modding by 16,384. Each master node in the cluster is responsible for a subset of these slots (e.g. in a 3-node cluster, Node A might handle slots 0–5500, Node B 5501–11000, Node C 11001–16383). This design makes scaling transparent – slots (and the keys in them) can be moved between nodes to rebalance or add/remove nodes without downtime. redis.io
Masters and Replicas (Failover): Redis Cluster uses a master-replica model for high availability. You need at least 3 master nodes for a functional cluster (to allow majority consensus) serverfault.com. Each master can have one or more replicas (slaves) as copies. If a master fails, the cluster will automatically promote one of its replicas to master to maintain availability medium.com. (However, if an entire master group – the master and all its replicas – goes down, the hash slots served by that group become unavailable. The cluster cannot continue if a majority of masters are offline.) Redis Cluster’s built-in failover is self-healing – it detects a down master via gossip and elections over the cluster bus and triggers failover without external orchestration.
Cluster Bus and Gossip: In addition to the standard Redis client port (6379 by default), each node opens a cluster bus port at (client port + 10000) (e.g. 16379) for internal node-to-node communication. Nodes use the cluster bus to gossip cluster state, detect failures, coordinate slot migrations, and authorize failovers. This communication is binary and efficient, and clients do not use the bus port (only the regular Redis ports). Important: Both the client port and the bus port must be accessible between all nodes (no firewalls blocking them), or the cluster will not function properly.
Hash Slot Allocation & Multi-Key Operations: A key benefit of clustering is that it can continue operations if some nodes fail (as long as the slots are covered by remaining masters). However, because data is sharded, multi-key operations in Redis (transactions, scripts, MSET/MGET, etc.) are limited to keys that reside on the same shard. Redis Cluster ensures the highest throughput when a multi-key command or transaction involves keys in the same hash slot, since it can be executed by a single node without cross-node communication redis.io
. If you send a command involving keys from different slots, the cluster will return a CROSSSLOT error and refuse the operation (certain read commands like MGET have special handling, but in general cross-slot writes/transactions are not allowed) dragonflydb.io. To handle use cases that need multiple related keys, Redis Cluster offers hash tags: you can wrap a portion of the key name in {…} braces to force that part to be hashed, ensuring keys with the same tag go to the same slot. For example, keys named user:{42}:profile and user:{42}:settings share the tag {42}, so they will hash to the same slot – allowing a multi-key operation like MGET on those two keys to succeed in cluster mode. (Use this feature judiciously – putting too many keys under one tag can unbalance the cluster.)
Consistency Model: Redis Cluster favors availability and partition tolerance. It uses asynchronous replication to replicas, so a failover may lead to some recent writes being lost if the master failed before propagating to replicas. It provides eventual consistency (not strong consistency) in failover scenarios. In practice, this means Redis Cluster can continue operating through node failures, but may lose the last few writes during a failover event. Clients should be designed to handle the possibility of retries or lost updates on failover.
Diagram – Redis Cluster Topology: Below is a visual representation of a Redis OSS Cluster with 3 masters and 3 replicas. Each master handles a portion of the hash slot range, and each replica continuously replicates its master. If a master fails, its replica will be promoted to master automatically.
(Each arrow shows a master -> replica relationship. All masters also communicate with each other over the cluster bus to manage the cluster state.)Setting Up a Redis Cluster Lab with Docker Compose
It’s easy to experiment with Redis Cluster on a single machine using Docker. The recommended minimal cluster for learning is 6 Redis containers (3 masters + 3 replicas), which provides sharding and one replica per master for failove serverfault.com. However, you can also start with 3 masters (no replicas) if you just want to see sharding in action (note that without replicas, a node failure will take the cluster down since no backup node can take over its slots).
This compose keeps each node’s config simple but correct for clustering in containers: we set
cluster-enabled yes,cluster-announce-ip, and explicit announce ports so other nodes and your host can reach them. (The bus port must be reachable, or cluster gossip/FAILOVER won’t work.) Stack Overflow
| |
| |
Create a single shared config file ./conf/redis-node.conf (each container’s env overrides what needs to be unique):
| |
Notes:
- Redis Cluster needs both the client port and bus port open; we explicitly expose and announce both.
- You can also use a prebuilt “all-in-one” cluster image (ports 7000–7005) for quick demos, but Compose above mirrors production networking better. Docker Hub
Create the cluster
| |
--cluster-replicas 1 gives you one replica per master automatically when forming the cluster. Use --cluster-yes to skip the interactive confirmation (useful for scripting/CI). medium
Auto-failover test scenarios
Redis Cluster’s gossip + voting promotes a replica when it detects a primary failure (subject to
cluster-node-timeout). Ensure the bus port is open or failover won’t coordinate. Redis
Scenario A — Kill one primary
| |
Scenario B — Network-isolate a primary (simulate partition)
| |
Two practical sharding strategies for OHLCV
What Cluster can/can’t do
- A cluster has
16,384 hash slots; each master owns a subset. A key’s slot =CRC16(key) % 16384. Keys land on different masters based on their slots. - Multi-key commands only work when all keys hash to the same slot (use {…} hash tags to force colocation). If keys are on different slots, you’ll hit CROSSSLOT. CodeProject
- RedisTimeSeries stores one time series per key. You scale by creating many series keys; you do not split one series across masters. Querying multiple series is done with TS.MRANGE/MGET + labels.
Many symbols → shard by symbol (recommended)
- Keys (colocate each symbol’s 5 fields; different symbols spread naturally):
| |
The
{BTCUSDT:1d}hash tag keeps a symbol’s fields on one shard (enables multi-key ops likeTS.MADD); other symbols (ETHUSDT,SOLUSDT, …) use different tags and naturally spread across masters. This balances the cluster when you have many symbols.
- Create with labels for flexible queries:
| |
Then you can query across many series using labels:
| |
(MRANGE queries many series by labels.)
- Ingest (atomic multi-key on one slot):
| |
(Works because all five keys share the same hash slot via the tag.)
When to use: You have many symbols—distribution emerges “for free” because each symbol’s tag hashes to a different slot. This is the simplest, most robust design.
Redis Cluster Scaling
Redis Cluster allows horizontal scaling by sharding data across multiple nodes. In Redis OSS (open source), scaling is a manual operation – you must explicitly add nodes and redistribute slots, since auto-resharding is not built-in for OSS severalnines.com (unlike Redis Enterprise which supports automatic rebalancing triggers). The basic scale-out workflow is:
- Add new Redis nodes (pods) as cluster members – these can be masters or replicas.
- Assign hash slots to new masters (resharding) – move a portion of existing slots (and their keys) to the new master node(s), i.e. rebalance.
- Adjust replicas if needed – attach new replica pods to masters for HA.
- Validate cluster state – ensure all 16384 slots are covered and cluster is balanced.
Skipping the rebalancing step can leave new nodes empty and others overloaded, so always plan to migrate slots when scaling out.
Adding New Master and Replica Nodes in Kubernetes
There are two common scenarios: manual scaling (using kubectl and redis-cli) and operator/Helm-driven scaling. In either case, use a Kubernetes StatefulSet for Redis pods so that each node has a stable network identity and persistent storage (to survive restarts without losing cluster config) medium.com
Manual Scaling with redis-cli (CLI Example)
If managing the cluster manually, you can scale out by increasing the StatefulSet replica count and then using redis-cli --cluster commands:
- Scale up the Redis StatefulSet to create new pods. For example, if you have 6 pods (3 masters + 3 replicas) and want to add one master with one replica (total 8 pods):
| |
This will start two new pods (e.g., redis-cluster-6 and redis-cluster-7)
2. Add a new master node to the cluster using the CLUSTER ADDNODE command (via redis-cli). We target an existing cluster node to introduce the new node:
| |
Replace <new-node-ip> with the IP of the first new pod (e.g. redis-cluster-6 pod IP), and <existing-master-ip> with an IP of a current cluster master (e.g. redis-cluster-0 pod IP). This command sends a cluster MEET to join the new node as a master (initially with no slots).
3. Add a new replica node and attach it to a master. You can either specify the master ID or let Redis auto-select the master with the fewest replicas. For example, to join redis-cluster-7 as a replica:
| |
Using --cluster-slave without specifying --cluster-master-id will attach the new node as a replica to the master that has the least replicas (likely the newly added master). You could also provide a specific master’s node ID via --cluster-master-id <ID> if needed.
4. Rebalance the cluster slots to utilize the new master. Until this step, the new master has 0 hash slots (no data). Use the Redis cluster rebalance command:
| |
The --cluster-use-empty-masters flag ensures that empty nodes get their fair share of slots. This will move hash slots from existing masters to the new master, migrating keys online. You will see output indicating slot transfers and key migrations. For example, a new master will start receiving roughly 1/(new master count) of the slots from the others. During this resharding process, the cluster remains operational for clients. humansecurity.com
Redis Cluster Slot Rebalancing Strategies
When new masters join, you must redistribute slots, otherwise they remain unused. There are two approaches:
- Manual Resharding: Using
redis-cli --cluster reshardallows fine-grained control. You specify how many slots to move and from which source node(s) to which target. For example, to move 4096 slots to a new node IDNODE_NEWtaken evenly from all existing masters:
| |
This would interactively (or with --cluster-yes for non-interactive) migrate slots. You could choose specific source node IDs if you want to offload certain masters more than others.
- Automatic (Equal Distribution) Rebalance: Using
redis-cli --cluster rebalance. This command will evenly balance slots across all masters. By default it tries to minimize movement; with--cluster-use-empty-mastersit specifically gives empty new nodes a proportionate share humansecurity
| |
will compute the ideal slots per master (roughly total_slots / N_masters) and migrate slots accordingly. This is the simplest way to incorporate new nodes.
Which to use? For most cases, --cluster rebalance is sufficient and easier. Use manual reshard only if you need custom control (e.g., migrating specific slots or doing stepwise moves). Keep in mind Redis OSS doesn’t auto-rebalance on its own – you or your tooling must trigger it. (Some operators will effectively call these commands under the hood as part of scaling.)
Rebalancing Best Practices:
- Size your migration: moving massive amounts of data will incur load. If possible, add one master at a time and rebalance, rather than adding many at once. This limits the scope of each reshard operation.
- Off-peak operations: Perform slot rebalancing during low traffic periods. Key migration is CPU and network intensive and can temporarily increase latency as keys are copied between nodes. ibm.github.io
- Minimize moved data: If you can, purge or archive cold data before scaling out. “Reducing data ensures smaller amounts have to be moved, which reduces the time required for the scale operation.” For instance, if using retention on time-series, consider lowering retention (dropping very old entries) before adding nodes. learn.microsoft.com
- Verify after rebalancing: Use
redis-cli --cluster checkto confirm all slots are covered and roughly evenly distributed. Also check that no node is handling a disproportionate number of keys (useCLUSTER NODESorINFO keyspaceon each). severalnines.com
Redis Sentinel: High Availability and Monitoring
Core Purpose and Architecture
Redis Sentinel is a high availability solution designed specifically for non-clustered Redis deployments. It provides monitoring, notification, automatic failover, and configuration management for master-replica Redis setups. redis.io
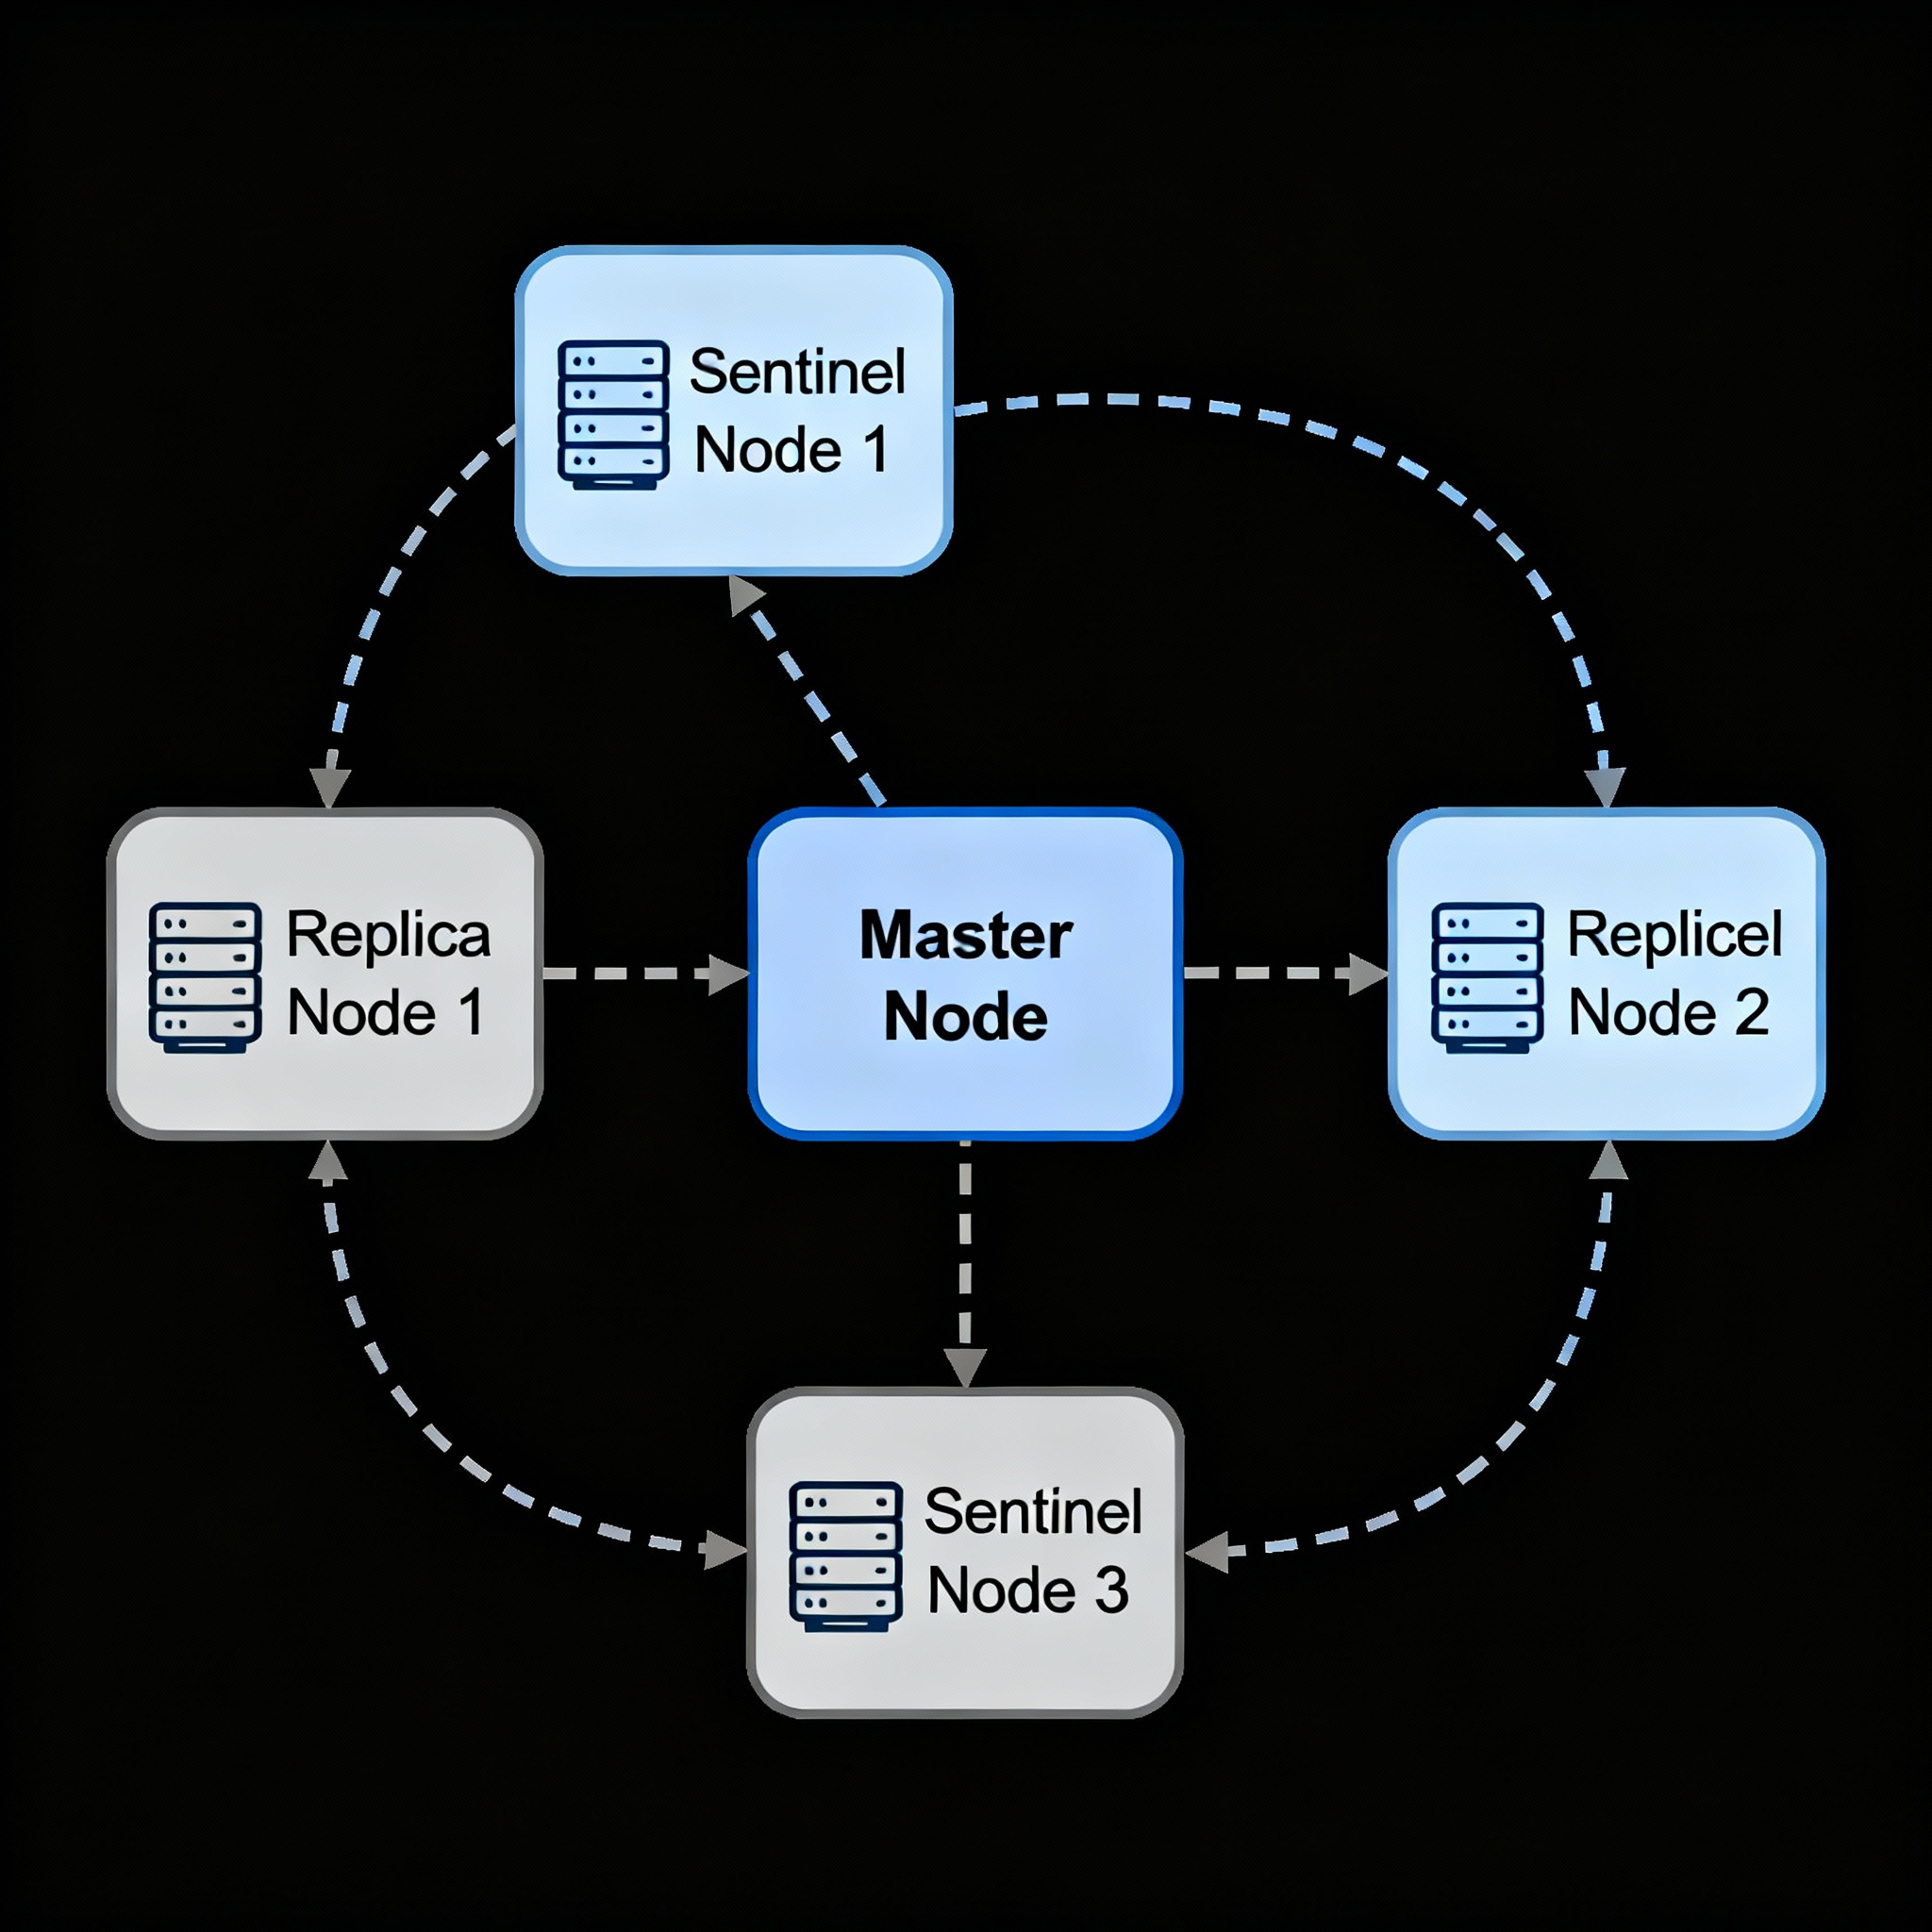
Redis Sentinel architecture with monitoring and failover
Key Features and Mechanisms
Redis Sentinel operates as a distributed system where multiple Sentinel processes cooperate to monitor Redis instances. The minimum recommended setup includes 3 Sentinel instances to avoid false positives and ensure robust failure detection. understanding-sentinels manage-sentinels
Quorum-Based Failover
Sentinel uses a quorum-based approach for failover decisions. The quorum represents the minimum number of Sentinels that must agree a master is unreachable before triggering failover. For example, with 3 Sentinels and a quorum of 2, at least 2 Sentinels must confirm master failure before initiating failover. gitlab hevodata
Automatic Discovery and Configuration
Sentinels automatically discover other Sentinels and replica nodes through Redis’s Pub/Sub capabilities, specifically using the __sentinel__:hello channel. This eliminates the need to manually configure all Sentinel addresses in each instance.
High Availability Focus
Redis Sentinel provides very high availability without human intervention. Even if all replica nodes fail, the system can continue operating with just the master node, though this reduces redundancy. system-design-redis-sentinel-vs-cluster-pros-and-cons
Setting up Redis Sentinel via Docker compose
| |
| |
| |
Architectural Differences and Trade-offs
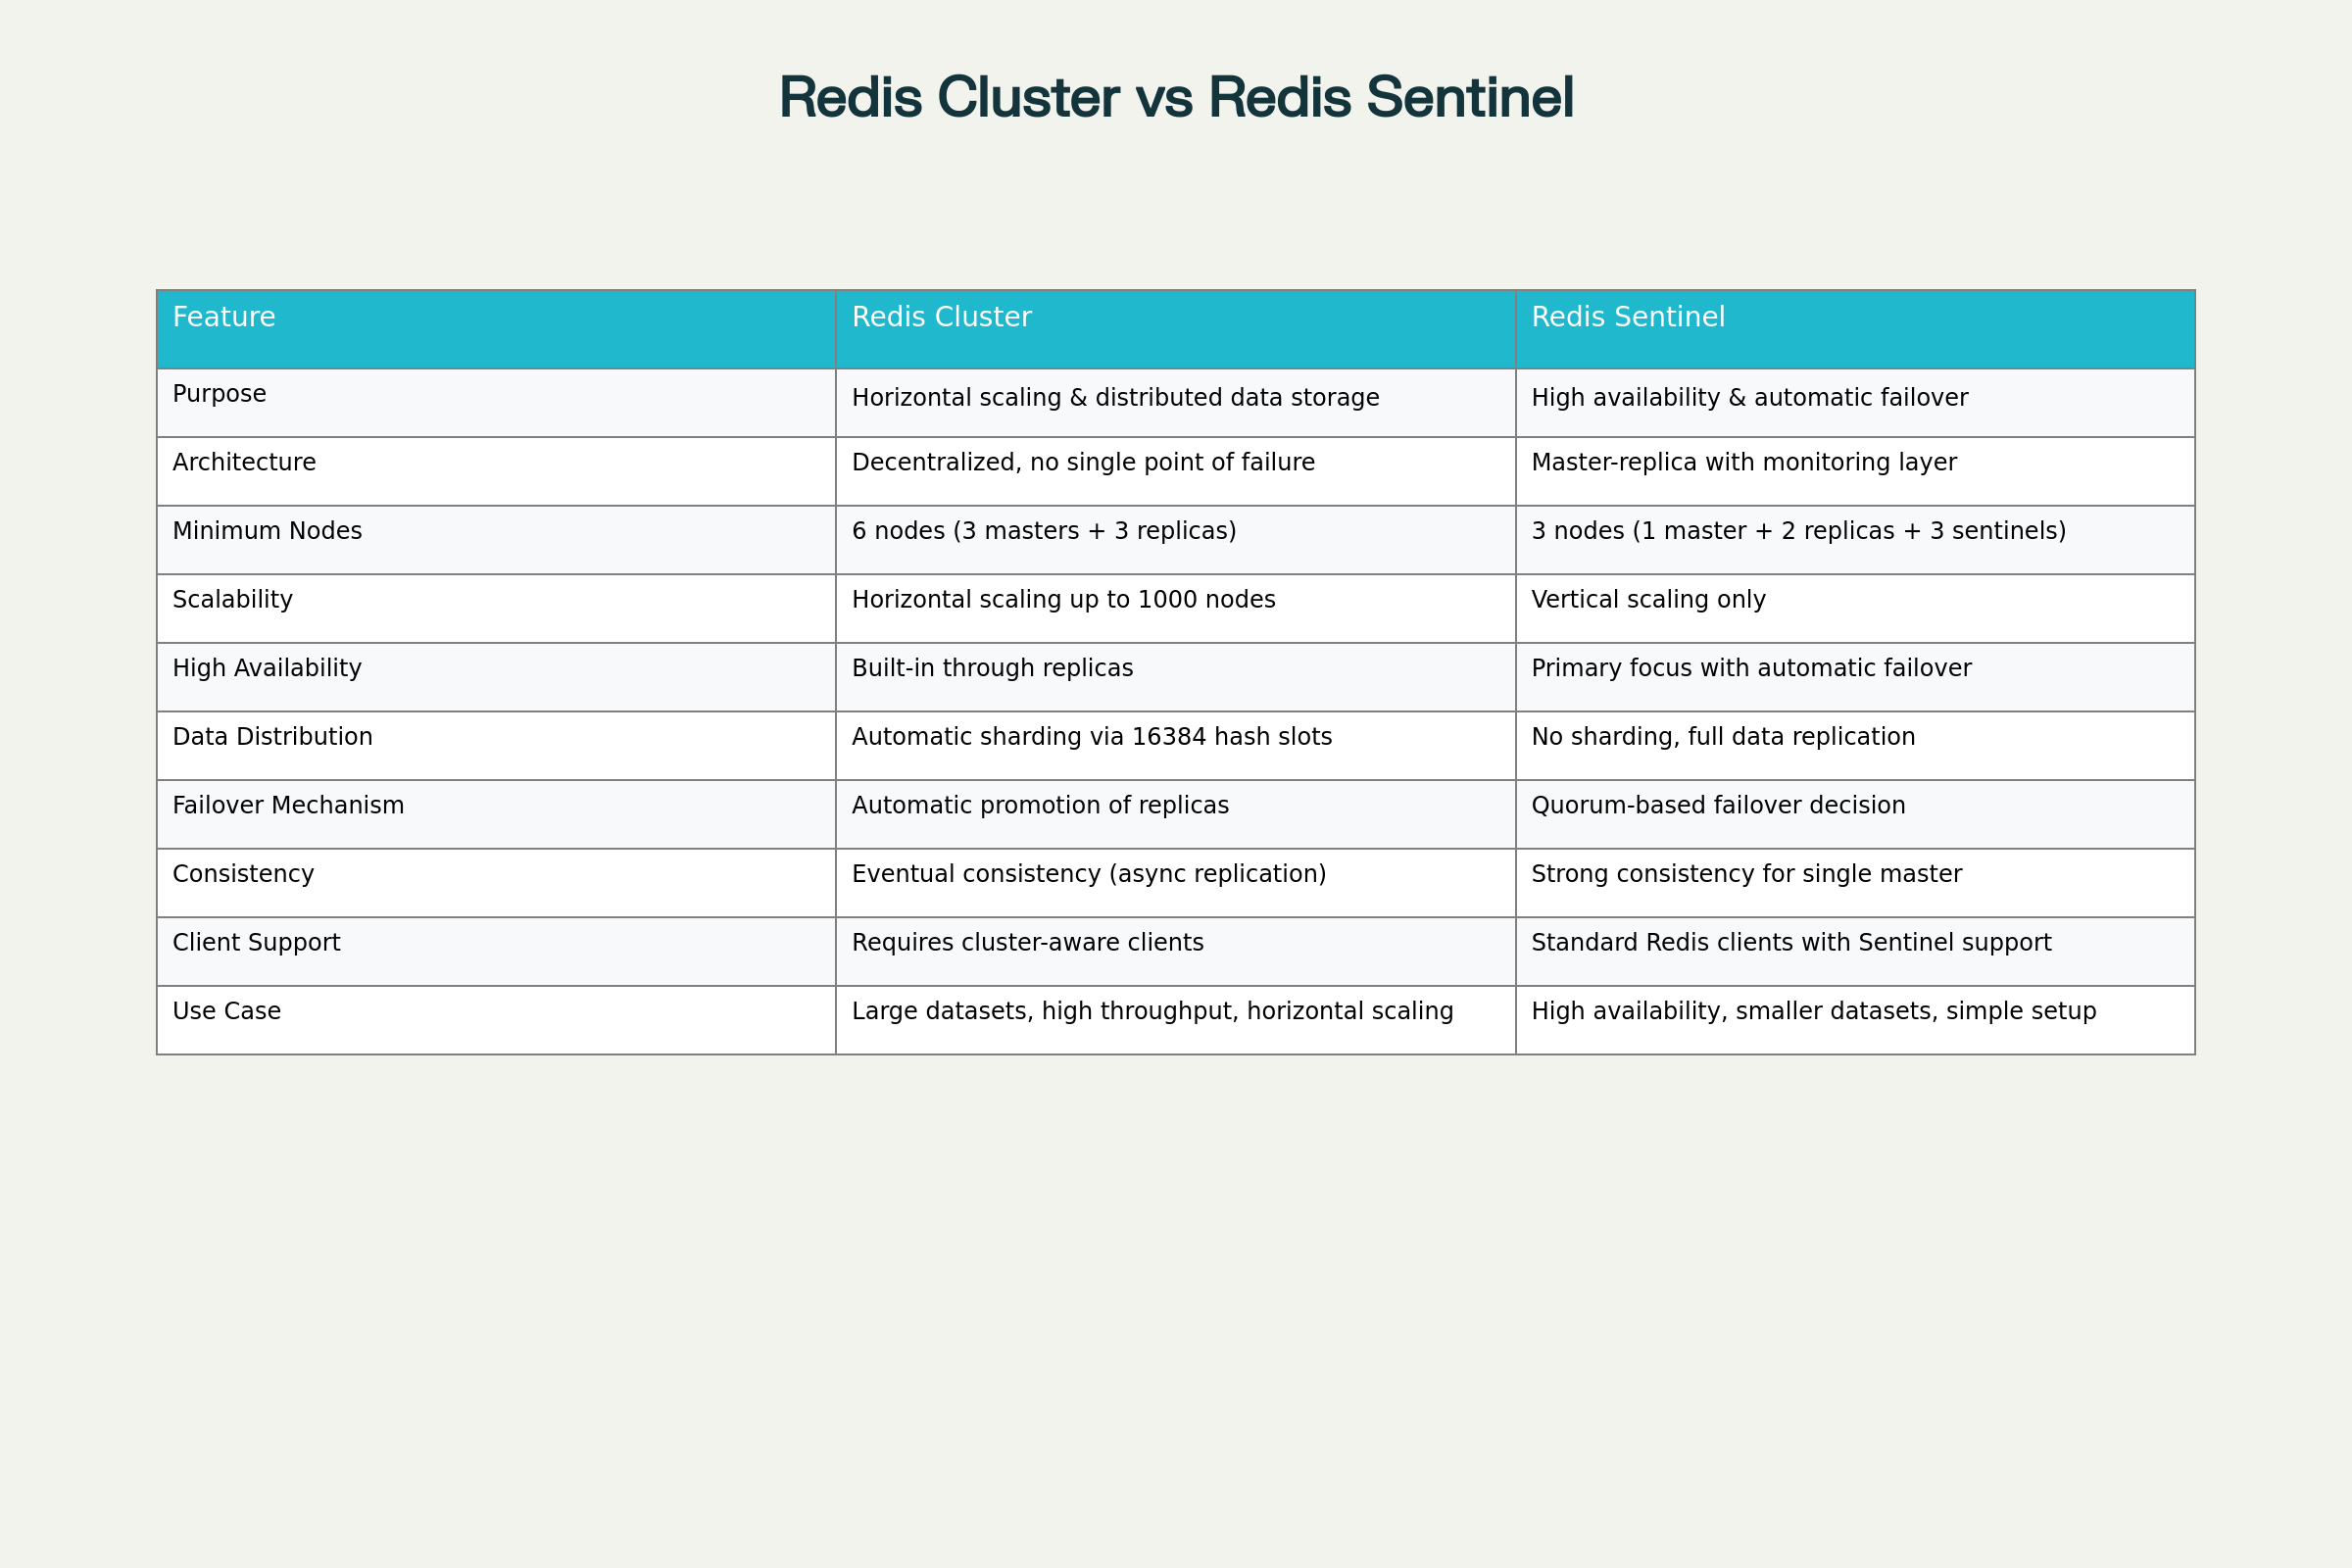
Scalability Comparison
Redis Cluster excels in horizontal scalability, allowing applications to scale beyond single-server limitations. It can handle datasets larger than available RAM on a single machine by distributing data across multiple nodes.
Redis Sentinel focuses on vertical scaling and cannot address read-write separation at scale. All write operations must go through the single master node, limiting write scalability.
Complexity and Client Requirements
Redis Cluster requires cluster-aware clients that can handle redirection (MOVED and ASK errors) and understand the distributed nature of the system. Clients need to cache the mapping between keys and nodes for optimal performance.
Redis Sentinel works with standard Redis clients that support Sentinel discovery. Popular client libraries include redis-py (Python), Jedis/Lettuce (Java), go-redis (Go), and NRedisStack (.NET).
Data Distribution Models
Redis Cluster implements true data sharding, where each node contains only a subset of the total dataset. This enables massive scaling but introduces complexity in multi-key operations.
Redis Sentinel uses full data replication, where each replica contains the complete dataset. This simplifies operations but limits scalability due to memory requirements on each node.
Consistency Guarantees
Redis Cluster provides eventual consistency due to asynchronous replication. Write acknowledgments may occur before data reaches all replicas, potentially leading to data loss during failures.
Redis Sentinel can provide stronger consistency for single-master operations, especially when combined with synchronous replication using the WAIT command.
Use Case Recommendations
Choose Redis Cluster When:
- Large datasets that exceed single-server memory capacity
- High write throughput requirements across multiple nodes
- Horizontal scaling is essential for future growth
- Application can handle eventual consistency trade-offs
- Resources available for cluster-aware client development
Choose Redis Sentinel When:
- High availability is the primary concern over scaling
- Simpler deployment and management requirements
- Strong consistency needs for single-master operations
- Existing Redis applications that can easily integrate Sentinel support
- Smaller datasets that fit comfortably on single nodes
Performance and Operational Considerations
Redis Cluster Performance Redis Cluster can achieve 200,000+ operations per second with multiple nodes, though performance may decrease slightly during resharding operations (~5% throughput impact). The distributed nature allows for linear performance scaling as nodes are added. redis-cluster-vs-redis-sentinel
Redis Sentinel Performance Redis Sentinel typically provides sub-10 second failover times, ensuring minimal downtime during master failures. However, all operations are limited by the single master’s capacity.
Network and Configuration Requirements
Redis Cluster requires two TCP ports per node: the standard Redis port (6379) and a cluster bus port (typically +10000). All nodes must be able to communicate on both ports.
Redis Sentinel uses standard Redis ports with additional Sentinel instances running on separate ports (typically 26379). The configuration is generally simpler with fewer network requirements.